# Developer Features
# Custom Script
TIP
Script block is designed to perform smaller tasks in between conversation flows. On free plans, there is a limit of 1000ms after which the script will terminate. On a paid plan the limit is up to 10s.
Use script block to push data to CRM and or create dynamic content.
import Ext from 'bot-extension';
const __ = Ext.default;

exports.handler = (context, done) => {
    done(__.text("Hello world"));
};
Note: The above script block needs to be included in all script blocks at a bare minimum if the script interacts with the bot. Context is only available when bot-extension is imported.
Here handler is the function that runtime calls to start the execution of a custom code block. The runtime passes the bot context and any input from the user to this handler.
The parameter context has the following properties:
| Property Name | Description |
|---|---|
| args | User input and events. |
| nlp | Provides natural language understanding like intent, confidence, and entities for an expression. |
| vars | Set or get custom variables in a conversation scope. |
# Rendering UI Elements dynamically
You can use script block to render UI elements like , text, image, card, carousel, etc. dynamically.
# Text response
import Ext from 'bot-extension';
const __ = Ext.default;

exports.handler = (context, done) => {
    //console.log(context.args);
    done(__.text("Hello world"));
};
# Image Response
import Ext from 'bot-extension';
const __ = Ext.default;

exports.handler = (context, done) => {
    //console.log(context.args);
    done(__.image("https://docs.smartloop.ai/assets/img/smartloop-dash.d74fc600.png"));
};
# Button Template
import Ext from "bot-extension";
const __ = Ext.default;

exports.handler = (context, done) => {
    const button = __.buttonTemplate("Hello! Welcome to Cars.\nLive with a style 🥰", [
            __.postbackButton('I want mine','<block_id>'),
            __.urlButton('Button2', "https://smartloop.ai")]);
    done(button);
};
# Carousel
import Ext from "bot-extension";
const __ = Ext.default;

exports.handler = (context, done) => {
  const result = {
      forecast : [
          {
              id : 1,
              day : new Date().toISOString(),
              temp: '60F',
              icon: 'https://icons.recime.io/1586749644.png'
          },
          {
              id : 2,
              day : new Date().toISOString(),
              temp: '40F',
              icon: 'https://icons.recime.io/1586749644.png'
          }
      ]
  }
  const t = __.genericTemplate(result.forecast.map(r => {
    return __.genericItem(r.day, r.temp, r.icon,
        null,[
            __.postbackButton('Detail', `block_id`)
        ]);
  }));

  done(t);
};
# Webhook
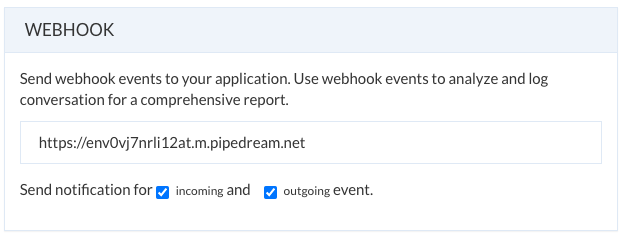
Setup webhook to send out conversation data to your application. Click on the settings icon and paste the url where you want the webhook notifcations to be sent:

Here in the above example, smartloop is going to send notifications for both in/out response to your specific endpoing.
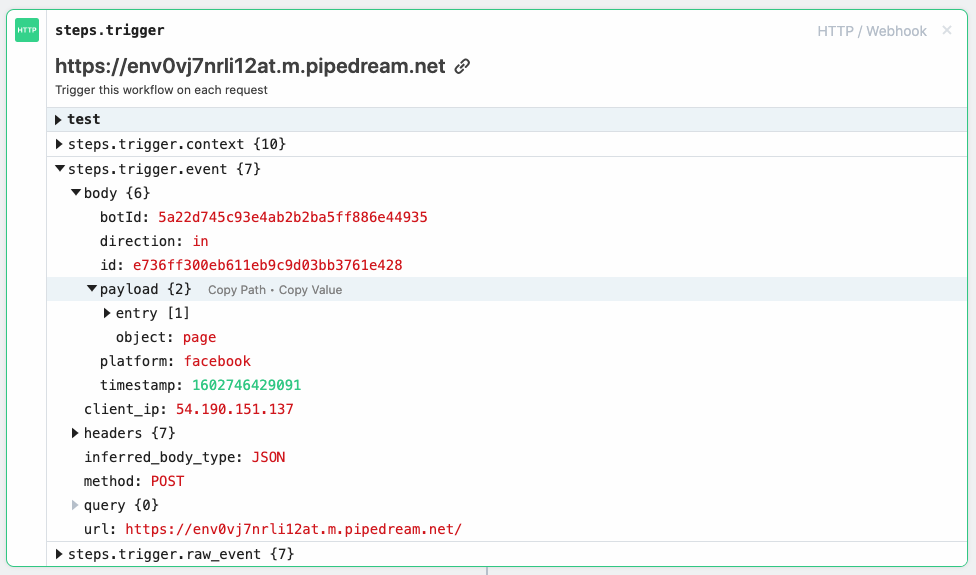
Sample webhook notification:

# Using variables in script block
The variables can be accessed in any script block. The scope of the variables is global by default.
To set a variable, use context.vars.set("name", "John")
To get a variable setup earlier, use let username = context.vars.get("name"). This will return the value set for variable 'name' either in the script block or the builder.
You can use variables in text block set using context.vars.set("name", "John") in a script block earlier, like this:

# Config vars
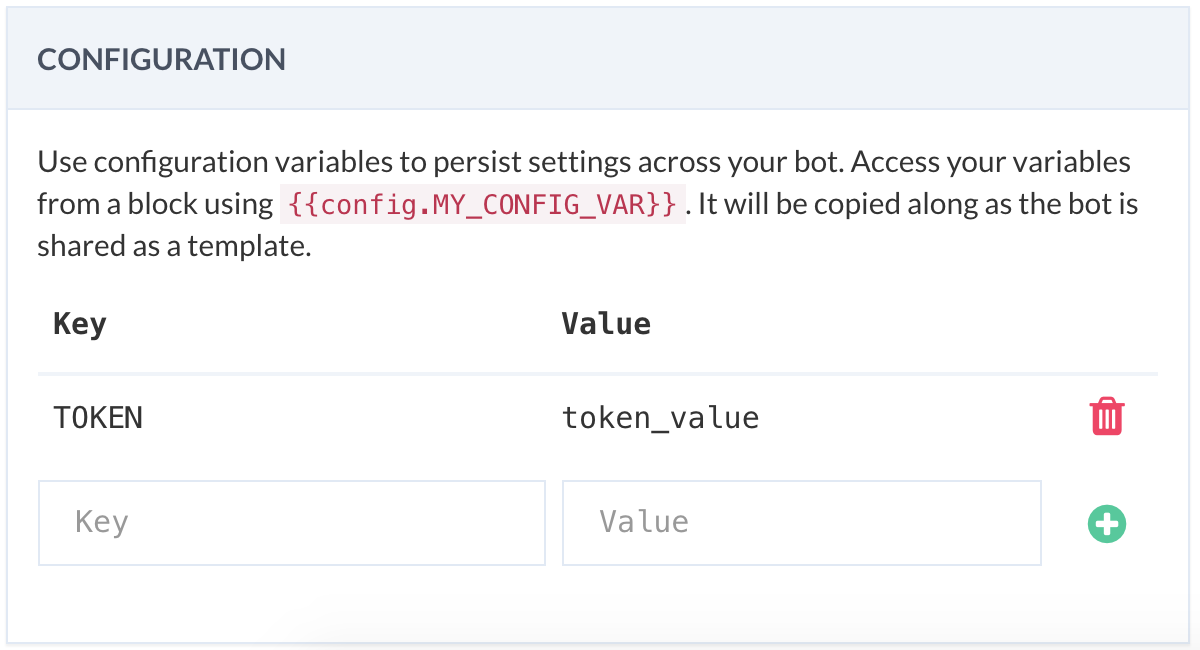
You can use config vars to persist settings across the bot. It is a good practice to consolidate your configuration (e.g., API key) in one place for maintainability.

Configuration variables added in the settings-> configuration, as shown above, can be accessed using double braces from plugins (e.g., JSON API) in the following way:
{{config.API_KEY}}
Similarly, you can access them from code, in the following way:
exports.handler = (context, done) => {

    const token = context.config.API_TOKEN;

    // TODO:

    done();
};
TIP
- Config var keys should use only alphanumeric characters and the underscore character (_).
- Config var keys should not begin with a double underscore (__).
# Modules
You can use modules to dynamically render conversation UI elements or make requests to your CRM
# Bot Extension
Use bot extension (opens new window) module to print out text or rich media as supported by the underlying platform.
An example showing how to display text dynamically using the extension module:
import Ext from 'bot-extension';
const __ = Ext.default;

exports.handler = (context, done) => {
    done(__.text("hello world"));
};
# Request
Request (opens new window) is designed to be the simplest way possible to make HTTP calls:
The following example makes a test request to 'httpbin' endpoint.
import request from 'request';

exports.handler = (context, done) => {

    request({
        url : 'http://requestbin.fullcontact.com/yyo7f7yy',
        method :'POST',
        json: true,
        body: {
            "p": 1
        }
    }, (err, response, body)=>{
        console.log("completed");
        done();
    })
};
# Moment
Use moment (opens new window) to parse, validate and manipulate and display dates and times. The following example of generating bot timestamp using moment:
import moment from 'moment';

exports.handler = (context, done) => {
    const timestamp = moment().unix().toString();

    console.log('Timestamp ' + timestamp);

    done();
};
← Sharing API Access →